Introduction to Cut Out Top Hat Template Printable

A cut out top hat template is a printable pattern that can be used to create a top hat. It provides an Artikel and guide for cutting and assembling the hat, making the process easier and more precise.Using a printable template for making a top hat offers several benefits.
Firstly, it saves time and effort compared to creating a pattern from scratch. The template is already designed with the correct measurements and proportions, ensuring a well-fitted hat.Additionally, a printable template allows for consistent results. Each hat made using the same template will have the same shape and size, creating a professional and polished look.
This is especially useful for making multiple hats for events or performances.Now, let’s explore some interesting facts about top hats and their history.
Top Hats: A Brief History
Top hats, also known as beaver hats or stovepipe hats, were popular men’s hats in the 19th century. They were characterized by their tall, cylindrical shape and flat brim.These hats became fashionable during the Victorian era and were commonly worn by wealthy and upper-class individuals.
They were a symbol of status and often associated with formal attire and special occasions.Top hats were typically made from felt, which was made from the fur of beaver or rabbit. The felt was shaped and molded to create the distinctive tall crown and flat brim.
The hats were often embellished with ribbons, feathers, or other decorative elements.In addition to their fashionable appeal, top hats also served practical purposes. The tall crown provided extra headroom, allowing the wearer to maintain an upright posture even in crowded spaces.
The flat brim offered protection from the elements, shielding the face from rain or sun.As fashion trends evolved, the popularity of top hats declined. However, they still hold a nostalgic charm and are occasionally worn for formal events or theatrical performances.
Finding a Cut Out Top Hat Template Printable

Looking for a printable top hat template? You’ve come to the right place! In this section, we’ll provide you with some tips on where to find printable top hat templates online and discuss the different types of templates available, including sizes and designs.
We’ll also compare the options of free and paid templates, so you can choose the best option for your needs.
Where to Find Printable Top Hat Templates Online
If you’re looking for a cut out top hat template that you can print and use, there are several websites where you can find them. Here are some popular options:
- Template websites: Websites that specialize in providing various templates often have a section dedicated to hat templates. Some popular template websites include Template.net, Printablee.com, and TemplateLab.com.
- Crafting websites: Websites that focus on crafts and DIY projects may also offer printable top hat templates. Websites like Craftsy.com and Pinterest.com can be great resources for finding templates.
- Online communities: Online communities and forums related to crafts and DIY projects often have members who share their own top hat templates. Websites like Reddit.com and Craftster.org can be great places to find unique templates.
Different Types of Top Hat Templates Available
Top hat templates come in various sizes and designs, allowing you to choose the one that fits your needs. Some common types include:
- Standard-sized templates: These templates are designed to create a top hat of a standard size, which is suitable for most adults.
- Children-sized templates: If you’re making a top hat for a child, you can find templates specifically designed for kids.
- Miniature templates: Miniature top hat templates are perfect for crafts, decorations, or doll accessories.
- Customizable templates: Some templates allow you to customize the size and design of the top hat to suit your preferences.
Free vs. Paid Options for Printable Templates
When it comes to printable top hat templates, you’ll find both free and paid options. Here are some things to consider:
- Free templates: Free templates are widely available and can be a great option if you’re on a tight budget. They may have limited design options, but they can still serve their purpose.
- Paid templates: Paid templates often offer more design options and higher quality. If you’re looking for a specific design or want a professional-looking top hat, a paid template might be worth the investment.
Remember to choose a template that suits your needs and skill level. Whether you go for a free or paid option, a printable top hat template can be a fun and convenient way to create your own top hat.
Printing and Cutting the Template
Once you have found a suitable cut out top hat template printable, it’s time to print and cut it out. Here’s a step-by-step guide on how to do it:
Downloading and Printing the Template
To download the template, simply click on the provided link and save it to your computer. Make sure you have a PDF reader installed to open the file. Once downloaded, open the file and go to the print settings. Here, you can choose the paper size and orientation.
It is important to use the correct paper size for printing to ensure that the template fits perfectly.
Using the Correct Paper Size
When printing the template, it is crucial to use the correct paper size. Most templates are designed to be printed on standard letter-sized paper (8.5 x 11 inches) or A4 paper (8.27 x 11.69 inches). Using a different paper size may result in the template not fitting properly or the proportions being distorted.
Check the template instructions or description to determine the recommended paper size.
Cutting the Template
Once you have printed the template, it’s time to cut it out. Here are some tips to ensure accurate cutting:
- Use a sharp pair of scissors or a craft knife for precise cuts.
- Take your time and cut along the designated lines or edges of the template.
- If the template includes intricate details, consider using a craft knife or small scissors for better control.
- Be careful not to cut into the template design itself.
- If needed, use a ruler or straight edge to guide your cuts and ensure straight lines.
Additional Tools or Materials
In addition to scissors or a craft knife, you may need the following tools or materials:
- A cutting mat or a protective surface to prevent damage to your work area.
- A bone folder or scoring tool to create crisp folds if the template requires folding.
- Adhesive such as glue or double-sided tape if the template needs to be assembled.
- Decorative materials such as markers, glitter, or ribbons to personalize your cut out top hat.
Assembling the Top Hat
To assemble the top hat using the template, follow these step-by-step instructions:
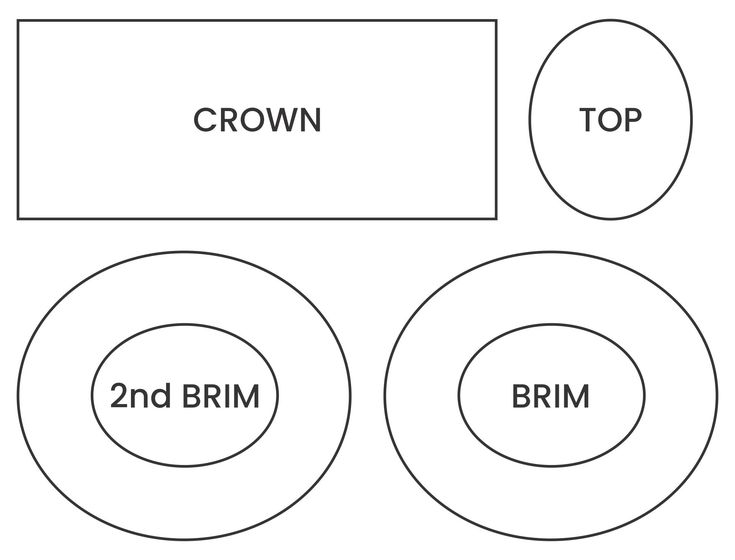
- Cut out the template along the solid lines. Make sure to cut out all the necessary pieces, including the brim, crown, and side panels.
- Fold along the dotted lines to create creases. This will help you shape the hat and give it structure.
- Start by folding the side panels inward and overlapping them slightly. Use glue or tape to secure the panels together.
- Next, fold the brim along the creases and attach it to the bottom of the crown. You can use glue or tape to hold it in place.
- Once the brim is attached, fold the crown along the creases and shape it into a cylindrical form. Use glue or tape to secure the ends together.
- Finally, attach the crown to the brim by inserting the tabs into the slits. Make sure the tabs are securely fastened to ensure the hat stays in place.
Additional Embellishments and Decorations
If you want to add some extra flair to your top hat, here are a few ideas:
- Attach a band or ribbon around the base of the crown to add a touch of elegance.
- Glue on decorative elements such as feathers, sequins, or beads to make the hat more festive.
- Use fabric or felt to cover the hat and give it a different texture or color.
- Paint or draw designs on the hat to personalize it and make it unique to your style.
Remember to let your creativity shine and have fun with the embellishments. Just make sure not to overload the hat with too many decorations, as it may become too heavy or lose its shape.
Tips for Sturdy and Secure Wear
To ensure that your top hat stays in place when worn, consider the following tips:
- Use a sturdy and thick paper or cardstock to make the hat. This will provide better durability and stability.
- Reinforce the seams and connections with extra glue or tape to make them stronger.
- Adjust the size of the hat to fit your head correctly. You can enlarge or shrink the template as needed before cutting it out.
- If necessary, add an elastic band or ribbon inside the hat to secure it under your chin or around your head.
- Store the hat in a cool and dry place when not in use to prevent it from losing its shape or getting damaged.
By following these steps and tips, you can assemble a top hat that is not only stylish but also sturdy enough to withstand wear and tear. Enjoy wearing your custom-made top hat for any occasion!
Tips for Customizing the Top Hat

Once you have printed and assembled your cut out top hat template, you can get creative and customize it to add your own personal touch. Here are some tips for customizing the top hat:
Adding Colors and Patterns
One way to customize your top hat is by adding colors and patterns. You can use markers, colored pencils, or paints to add vibrant colors to the hat. You can also use patterned paper or fabric to cover the hat and give it a unique look.
Be creative and experiment with different color combinations and patterns to make your top hat stand out.
Accessorizing the Top Hat
Another way to customize your top hat is by adding accessories. You can glue on ribbons, feathers, or sequins to embellish the hat. You can also attach decorative buttons or pins to give it a stylish flair. Accessories can help enhance the theme or occasion you are customizing the top hat for.
For example, you can add spooky Halloween-themed accessories for a Halloween party or festive decorations for a New Year’s Eve celebration.
Personalizing for Different Occasions or Themes
Customizing the top hat to suit different occasions or themes is a fun way to make it more unique. For a birthday party, you can add the person’s name and age to the hat. For a wedding, you can decorate the hat with flowers or lace to match the bridal theme.
You can also personalize the hat for holidays like Christmas or St. Patrick’s Day by adding themed decorations. Consider the event or theme you are customizing the top hat for and let your imagination run wild.
Inspiration for Creative Customization
If you’re looking for inspiration for creative customization options, here are some ideas:
- Steampunk Style: Add gears, cogs, and metallic accents to give your top hat a steampunk vibe.
- Birthday Celebration: Decorate the hat with balloons, confetti, and a birthday message to celebrate someone’s special day.
- Wedding Elegance: Use lace, pearls, and delicate flowers to create an elegant and romantic look for a wedding.
- Fantasy Adventure: Incorporate mythical creatures, like dragons or unicorns, and fantasy-themed elements to transport your top hat to a magical realm.
Remember, the possibilities are endless when it comes to customizing your top hat. Let your imagination guide you and have fun creating a unique and personalized accessory for any occasion.
Using the Top Hat Template for Other Crafts

The top hat template can be a versatile tool for various craft projects. Its simple and classic shape makes it suitable for a wide range of uses, from party decorations to centerpieces. Here are some ideas for repurposing the top hat template and step-by-step instructions for using it in alternative crafts.
Party Decorations
If you’re hosting a themed party, the top hat template can be a perfect addition to your decorations. Here’s how you can use it:
- Create mini top hats using the template and decorate them with colorful ribbons, feathers, or glitter. These can be placed on tables as fun party favors or used as part of a centerpiece arrangement.
- Use the template to make larger top hats out of sturdy cardstock or foam board. These can be hung from the ceiling or placed on walls to add a touch of whimsy to the party venue.
- Combine multiple top hats of different sizes to create a unique and eye-catching party backdrop. Decorate them with balloons or string lights for added charm.
Centerpieces
The top hat template can also be transformed into stunning centerpieces for various occasions. Here are a few ideas:
- Make a floral arrangement by placing a small vase or jar inside a decorated mini top hat. Fill it with your favorite flowers and greenery to create a charming centerpiece for a wedding or special event.
- For a vintage-inspired centerpiece, stack several top hats of different sizes and decorate them with lace, pearls, or vintage brooches. Fill each hat with flowers, candles, or other decorative elements.
Alternative Crafts
The top hat template can be used in various other crafts, beyond party decorations and centerpieces. Here are a couple of examples:
- Create a top hat-shaped gift box by printing the template on sturdy cardstock, cutting it out, and assembling it. Fill the box with small gifts or treats for a unique and creative presentation.
- Use the top hat template as a stencil for painting or drawing. Place it on a canvas or other surfaces, and trace the Artikel to create a top hat design. Fill in the design with your favorite colors and embellishments.
These are just a few ideas to get you started. Feel free to experiment and adapt the top hat template to suit your own creative projects. The possibilities are endless!