Introduction to Printable 3D Haunted House Template
A printable 3D haunted house template is a pre-designed blueprint that allows users to create a three-dimensional haunted house model. It is usually available in a printable format, which can be easily downloaded and printed for use.Using a printable 3D haunted house template offers several benefits.
Firstly, it saves time and effort as users do not have to start from scratch. The template provides a ready-made structure and design, making it easier to create a haunted house model. Additionally, it ensures consistency in the design, ensuring that the final model looks professional and well-planned.A
printable 3D haunted house template can be used for various occasions or events. One popular use is during Halloween celebrations. Individuals or organizations can use the template to create spooky decorations for their parties or haunted house attractions. It can also be used as a fun craft activity for children, allowing them to unleash their creativity while creating a Halloween-themed model.
Examples of Occasions or Events
- Halloween parties: The printable 3D haunted house template can be used to create spooky decorations for Halloween parties. It adds a festive and eerie atmosphere to the event.
- Haunted house attractions: For those who run haunted house attractions during Halloween, the template can be used to create realistic and detailed haunted house models.
- Classroom activities: Teachers can use the template as a craft activity during Halloween-themed lessons. It allows students to have fun while learning about spooky traditions.
- Home decorations: Individuals who enjoy decorating their homes for Halloween can use the template to create unique and eye-catching haunted house models.
Features of a Printable 3D Haunted House Template
A printable 3D haunted house template consists of several key components that allow users to create their own spooky haunted house model. These components include:
1. Structure
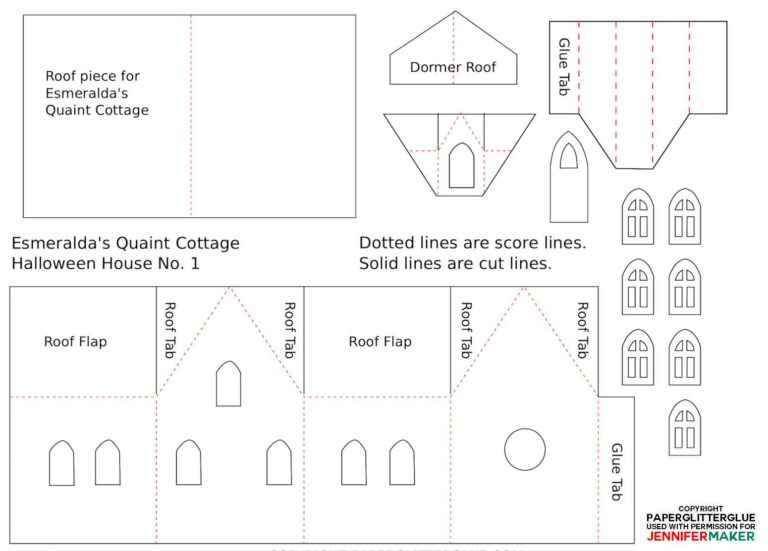
The template provides the basic structure of the haunted house, including walls, roofs, and floors. It is designed in such a way that when assembled, it forms a three-dimensional haunted house.
2. Walls and Windows
The template includes walls with windows, which add a realistic touch to the haunted house. The windows can be cut out to create openings for a more detailed and eerie look.
3. Doors
There are door sections in the template that can be attached to the walls to create entrance and exit points for the haunted house. These doors can be customized with spooky designs or left plain for a more mysterious effect.
4. Roof and Chimney
The template also includes a roof section that can be attached to the top of the walls. It gives the haunted house a complete look and protects the interior from imaginary rain or snow. The chimney adds an extra touch of detail and can be placed on the roof.
5. Interior Details
Some printable 3D haunted house templates also include interior details such as furniture, spooky decorations, and even miniature haunted house residents. These details can be cut out and placed inside the house to create a more realistic and immersive experience.
6. Customizable Features
Many printable 3D haunted house templates offer customizable features that allow users to personalize their haunted house. These features may include different color options for the walls and roofs, additional accessories, or the ability to add your own unique decorations.
7. Assembly Instructions
To ensure a successful creation of the haunted house model, the template usually comes with detailed assembly instructions. These instructions guide users through the step-by-step process of cutting, folding, and gluing the different sections together to form the final haunted house.
With these key components and customizable features, a printable 3D haunted house template provides a fun and creative way to bring the spooky spirit of Halloween to life.
Steps to Create a Printable 3D Haunted House
To create a printable 3D haunted house using the template, follow these step-by-step instructions:
Materials and Tools
Before you begin, make sure you have the following materials and tools ready:
- Printable 3D haunted house template
- Cardstock or thick paper
- Scissors
- Glue or adhesive
- Markers or colored pencils
- Optional: Craft knife for more intricate cuts
Assembling the House
Start by printing the haunted house template on a piece of cardstock or thick paper. Make sure to follow the printing instructions provided with the template.Once you have the printed template, carefully cut out each piece using scissors or a craft knife for more detailed cuts.
Take your time to ensure clean and precise cuts.Next, fold along the dotted lines on each piece to create the walls and roof of the haunted house. Use a ruler or straight edge to make the folds neat and crisp.Now
it’s time to assemble the house. Apply glue or adhesive along the tabs of each piece and carefully attach them together. Start with the main structure, then add the roof and any additional details provided in the template.Hold the pieces together firmly for a few seconds to allow the glue to dry and the pieces to stick together securely.
Adding Details
Once the main structure is assembled, you can start adding details to bring your haunted house to life. Use markers or colored pencils to color and decorate the walls, roof, and other components of the house.You can also use additional materials such as cotton balls for cobwebs, toy spiders or bats for a spooky touch, or small LED lights to create an eerie glow.Get
creative with your decorations and add any additional spooky elements you desire. Just make sure not to overload the house with too many decorations that might make it unstable or difficult to handle.And there you have it! Your printable 3D haunted house is complete.
Display it proudly as a Halloween decoration or use it for spooky storytelling and imaginative play.Remember to have fun throughout the process and let your creativity shine. Happy haunting!
Design Ideas and Inspiration for Printable 3D Haunted Houses
When it comes to decorating a printable 3D haunted house template, the possibilities are endless. Here are some creative design ideas to inspire you:
Spooky Forest Theme
Transform your haunted house into a creepy forest filled with tangled branches, fog, and eerie sounds. Add moss, leaves, and spider webs to create a more realistic effect. Hang ghostly figures from the trees and place spooky animal cutouts around the house.
Haunted Mansion Theme
Give your haunted house the grandeur of a haunted mansion. Use black and purple colors for a gothic feel. Decorate the walls with portraits of ghostly figures and dusty chandeliers. Don’t forget to include a creaky front door and a wrought-iron fence.
Zombie Apocalypse Theme
Create a post-apocalyptic scene with a zombie infestation. Use gray and green colors to depict a decaying world. Place zombie figurines around the house and add broken windows and barricades. Don’t forget the blood splatters and caution signs.
Witch’s Lair Theme
Transform your haunted house into a witch’s lair. Use purple and orange colors to create a mystical atmosphere. Hang broomsticks and cauldrons from the ceiling. Place potion bottles and spell books on shelves. Don’t forget the black cat figurines and a bubbling cauldron centerpiece.
Creepy Carnival Theme
Give your haunted house a sinister carnival vibe. Use red and black colors for a dramatic effect. Hang circus banners and place creepy clown cutouts around the house. Create a haunted carousel centerpiece and add flickering lights and carnival music to complete the ambiance.
Unique and Spooky Elements
- Creepy dolls with glowing eyes
- Spider webs and fake spiders
- Glow-in-the-dark skeletons
- Hanging bats and ravens
- Grim reaper figurines
- Haunted portraits that change faces
- Dripping blood effects
- Sound effects like screams and creaking doors
- Smoky fog machines
These are just a few examples of the many design ideas and themes you can incorporate into your printable 3D haunted house. Let your imagination run wild and create a spooky masterpiece!
Tips for Printing and Cutting the Template

When it comes to printing and cutting the template for your printable 3D haunted house, there are a few tips to keep in mind to ensure the best results.
Recommended Paper Size and Quality
It is recommended to use a standard letter size paper (8.5 x 11 inches) for printing the template. This size is widely available and easy to work with. As for the paper quality, choose a heavier weight paper, such as cardstock or photo paper, to ensure durability and stability when assembling the haunted house.
Different Printing Options and Settings
When printing the template, make sure to select the “Actual Size” or “100%” option in your printer settings to avoid any scaling issues. It is also advisable to use a high-quality print mode for better color and detail reproduction. If your printer offers a borderless printing option, you can enable it to create a seamless look for your haunted house.
Tips for Accurately Cutting Out the Template Pieces
Accurate cutting is crucial for achieving a clean and professional-looking haunted house. Here are some tips to help you cut out the template pieces with precision:
- Use a sharp pair of scissors or a craft knife with a fresh blade for clean cuts.
- Take your time and cut along the lines carefully, following the shape of the pieces.
- If there are intricate details or small pieces, consider using a small pair of scissors or a precision cutting tool for better control.
- For straight lines, you can use a ruler or a straight-edge to guide your cuts.
- Make sure to cut inside the lines to avoid any visible white edges.
- Double-check the orientation of each piece before cutting to ensure they are facing the right direction.
- If needed, you can print multiple copies of the template to have extra pieces in case of mistakes or damage during cutting.
Assembly and Decoration Techniques for Printable 3D Haunted Houses

When it comes to assembling and decorating your printable 3D haunted house, there are several techniques you can use to bring your creation to life. Here are some methods and tips to help you along the way.
Assembling the Printed Template Pieces
Before you begin assembling your haunted house, make sure you have printed and cut out all the template pieces. Here are a few methods you can use to put them together:
- Glue: You can use craft glue or a glue stick to adhere the sections of the haunted house together. Apply the glue to the tabs and press them firmly against the corresponding sides.
- Tape: Another option is to use clear tape to attach the sections. This can be especially useful if you want to make adjustments or disassemble the haunted house later on.
- 3D Printing: If you have access to a 3D printer, you can print the template pieces directly in a 3D format. This can create a more durable and precise structure.
Securely Attaching the Sections of the Haunted House
Once you have assembled the template pieces, it’s important to ensure that they are securely attached to create a stable haunted house. Here are some techniques you can use:
- Reinforcement: You can reinforce the joints and connections with additional glue or tape. This will help prevent any sections from coming loose or falling apart.
- Supports: If your haunted house has multiple levels or intricate details, you may need to add supports inside the structure. These can be made from cardboard or other sturdy materials.
- Paper Clips or Brads: For added stability, you can use paper clips or brads to connect the sections together. Simply punch small holes in the tabs and secure them with the clips or brads.
Adding Additional Decorations and Details
To enhance the overall look of your haunted house, you can add additional decorations and details. Here are some tips to consider:
- Paint: Use acrylic or craft paint to add color and texture to the walls and roof of the haunted house. You can also paint details such as windows, doors, and trim.
- Markers or Colored Pencils: If you prefer a more detailed or intricate design, you can use markers or colored pencils to add shading, patterns, or small decorations.
- Accessories: Consider adding small accessories such as miniature pumpkins, skeletons, or bats to enhance the spooky atmosphere.
- Lights: To create a hauntingly beautiful effect, you can incorporate LED lights or tea lights inside the haunted house. This will make it glow and create an eerie ambiance.
With these assembly and decoration techniques, you can bring your printable 3D haunted house to life and create a spooky masterpiece. Get creative and have fun!
Display and Presentation Ideas for Printable 3D Haunted Houses

Once you have completed assembling and decorating your printable 3D haunted house, it’s time to think about how to display it in a way that enhances its spookiness. Here are some suggestions for showcasing your haunted house:
1. Create a Haunted House Scene
Set up your printable 3D haunted house in a spooky scene to create an eerie atmosphere. You can use props like fake spider webs, plastic spiders, bats, and skeletons to enhance the haunted house theme. Consider adding other Halloween decorations such as pumpkins, witch hats, and eerie lighting to complete the scene.
2. Display on a Mantel or Shelf
Place your haunted house on a mantel or shelf in your home. This allows for easy viewing and adds a touch of spookiness to your living space. You can surround the haunted house with other Halloween-themed decorations to enhance the overall effect.
3. Incorporate Lighting Effects
To create a truly spooky atmosphere, consider incorporating lighting effects into your haunted house display. Use flickering LED candles or string lights with orange or purple bulbs to add an eerie glow. You can also use colored gels or filters on existing lights to create a haunting ambiance.
4. Display in a Shadow Box
If you want to preserve your haunted house and protect it from dust or damage, consider displaying it in a shadow box. This creates a framed display that adds depth to the scene and allows you to easily hang it on a wall or place it on a tabletop.
5. Showcase in a Halloween Village Display
If you have a collection of Halloween village houses or figurines, incorporate your printable 3D haunted house into the display. This creates a cohesive Halloween village scene that is sure to impress your guests.
6. Outdoor Display
If weather permits, you can also consider displaying your haunted house outdoors. Place it on your porch, in your garden, or in a designated Halloween display area. Make sure to secure it properly to prevent it from being damaged by wind or other elements.
7. Virtual Display
If you want to share your printable 3D haunted house with friends and family who are unable to see it in person, consider creating a virtual display. Take high-quality photos or videos of your haunted house and share them on social media, or create a virtual tour using 3D modeling software.
Maintenance and Storage Tips for Printable 3D Haunted Houses

Once you have printed and assembled your 3D haunted house, it’s important to take proper care of it to ensure it lasts and remains in good condition. Here are some tips for maintaining and storing your printable 3D haunted house:
Caring for the Printed Haunted House
- Handle the printed pieces with clean hands to avoid leaving fingerprints or smudges on the paper.
- Avoid placing the haunted house in direct sunlight or near sources of heat, as this can cause the colors to fade or the paper to warp.
- If the haunted house gets dirty or dusty, gently wipe it with a soft, dry cloth. Avoid using any cleaning products or liquids, as they may damage the paper.
Storing the Assembled House
- Before storing the assembled haunted house, make sure it is completely dry to prevent any moisture from causing damage.
- Find a suitable container or box to protect the haunted house from dust and potential damage. A sturdy cardboard box or plastic container with a lid works well.
- Place tissue paper or bubble wrap between the different sections of the haunted house to prevent them from rubbing against each other and getting damaged.
- Label the storage container with the name or description of the haunted house to easily identify it in the future.
Preserving the Template for Future Use
- Store the printed template in a flat, dry place to prevent it from getting wrinkled or torn.
- If you plan on reusing the template in the future, consider laminating it or placing it in a clear plastic sheet protector to protect it from wear and tear.
- Keep the template in a folder or envelope specifically designated for printable 3D haunted house templates to keep it organized and easy to find.
By following these maintenance and storage tips, you can ensure that your printable 3D haunted house remains in great condition and can be enjoyed for years to come.